Car maintenance: the DIY essentials for looking after your car
Taking care of your car doesn't need to be difficult – we cover the DIY maintenance you can’t ignore

Staying on top of your car’s maintenance is essential for keeping your vehicle safe, reliable, and running smoothly. Even though today’s cars are more reliable and tech-packed than ever before, drivers still need to look after the basics, like tyres and oil. Regular maintenance doesn’t just save you from unexpected breakdowns and expensive repairs – it also extends the life of your vehicle.
The best part? Many car maintenance tasks are far easier than you might think. Sure, it may be a bit daunting when you open your car’s bonnet for the first time, but you don’t need a garage full of tools or a mechanic’s expertise to handle the basics. Simple checks like monitoring your tyres, topping up essential fluids, or replacing wiper blades can all be done from the comfort of your driveway. Not only will you save money, but you’ll also gain the confidence of knowing your car is in good shape.
In this guide, we’ll walk you through some top tips for car maintenance that every driver should know, helping you keep your vehicle in tip-top condition without breaking the bank.
Tyres
Ensuring your tires are in good condition is perhaps the most important thing you can do – they’re the only thing keeping your car stuck to the road after all. Fortunately, they’re also one of the easiest things to check. The Highway Code recommends you check your tyre pressures once a week and it’s good practice to do the same before every long journey. But while you’re doing that, you may as well check your general tyre condition and wear, too.

To check your tyre pressure, first locate your car’s tyre-pressure chart, which is usually printed on the frame inside one of the doors, inside the fuel filler cap or in your car's handbook. It’ll tell you the correct pressures for your car – under normal circumstances and if you’re carrying more passengers or lots of luggage.
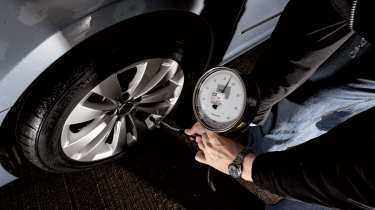
Because heat can cause the air in your tyres to expand, wait until your tyres are cold for a more accurate reading. Remove the tyre valve’s dust cap and screw or attach a tyre-pressure gauge onto the valve to get a reading. These are available online or from car spares shops across the country. Alternatively, you can use a gauge on a tyre foot pump or an air line in a petrol-station forecourt.
The tyre’s pressure will be displayed in the gauge. If the pressure is low, use a pump to inflate it to the correct amount.
Next up is tread depth. A tyre tread depth indicator is a cheap device for checking the amount of tread remaining on a tyre is above the 1.6mm legal minimum depth. Turn the steering wheel all the way in one direction, making it easier to check across the entire tread pattern and allowing you to spot uneven wear early.
Also, be sure to check for any cracking of the rubber. This can become an MOT failure and make a puncture or blowout more likely. The date of manufacture is stamped on the sidewall of the tyre near the manufacturer name. While there’s no legal maximum age of tyres on passenger cars, cracks are more likely to appear the older they get. Generally, tyres should be changed before they reach 10 years old, although most will have worn beyond the 1.6mm minimum tread depth before this point anyway.
Engine oil
This is another important check that’s really easy. The oil in your engine helps it to run smoothly by reducing the friction between moving parts. A low oil level can increase engine wear and, in some cases, lead to engine failure. A monthly check of the oil level and topping it up as required is a good way of prolonging the life of your car’s engine.
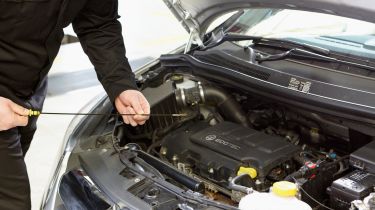
To check your car’s oil, make sure the engine is cool and the car is parked on level ground to ensure you get an accurate reading. Locate the dipstick, which will usually have a yellow or orange handle and will be located near the engine – your car’s handbook will help here.

Remove the dipstick, taking care not to drip any oil, and wipe with a piece of kitchen roll. Replace the dipstick fully and remove again. You’ll see the oil will have stuck to the dipstick somewhere between the minimum and maximum marks. If it’s on or around maximum, you’re fine. If not, you’ll need to top up the oil.
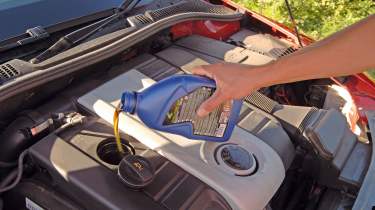
When the engine is cool, find the oil filler cap, which will be located on top of the engine. It’ll usually be indicated by an oil can symbol. It’s a good idea to brush any dirt or debris away from the area to avoid it falling inside the engine when you remove the cap.
Once the tap is removed, use a funnel and slowly pour the oil into the engine. Wait for a few moments for it to work its way inside the engine and check the depth using the dipstick – the level should be just below the maximum mark. Pour in more oil if necessary, but don’t overfill. Replace the dipstick, screw the oil cap back on and wipe away any oil that’s been spilt.
It’s vital you use the correct grade and type of oil to avoid engine damage or invalidating your car’s warranty. Your handbook or main dealer will be able to give you this information.
Grades of oil are usually referred to in numbers and letters, such as 10W-30, and synthetic and non-synthetic types are available.
- Performing and oil and filter change on your car
- What's the best oil for my car?
- How to check and top up your engine oil
Car lights
Broken or faulty lights can be dangerous (not to mention illegal), particularly in winter. You may not be aware of any problems, especially with rear lights or if you drive mostly on roads with street lights. It’s a quick job to walk around the car with your lights switched on to check they’re all working properly. Remember to test your fog lights, too, if your car has them.
To check the rear brake lights, press the brake pedal with the rear of the vehicle parked facing a reflective surface so you can see if they’re working, or ask someone to go behind the car and check for you. Never attempt to use an object to press the brake pedal and get out while the car is running, as this could easily lead to an accident.
If you spot that a light is faulty, it’ll need to be replaced. Now, this could either be an easy five minute job to swap a bulb, or it could be downright impossible for the average DIY-er. It depends on your car – generally, older cars with traditional bulbs are easiest, while newer cars with LED lights will need to be taken to a dealership.
- Best car headlight bulbs to buy
- Parking lights: how do they work and what are they for?
- What are xenon lights?
- What are LED daytime-running lights?
Windscreen washer fluid
This really couldn’t be easier. Locate the windscreen washer bottle cap, which will usually be located under the bonnet and have a windscreen washer jet symbol printed on top – check your car’s handbook if you’re unsure. The lid usually unclips, so if you’ve found a bottle with a screw top, then you’ve likely got the wrong one.
Once you’ve removed the lid, use a funnel to top up the fluid. Dedicated screenwash fluid is better than water or water mixed with washing-up liquid, as it doesn’t freeze as easily and contains detergent to shift dirt. Ready-mixed or concentrated screenwash (that you need to mix with water) are both available.
Fill the screenwash bottle near to the top and replace the lid.
Antifreeze
Antifreeze does exactly what it says on the tin – stops the water in your engine from freezing. It’s also called coolant, because the antifreeze and water mixture is used to stop your engine from overheating. It’s an essential fluid for your engine, so keeping a regular eye on it is important.
The coolant reservoir will be under the bonnet and is identifiable by warning stickers on the lid. It’s vital you find the right bottle, so check your car’s handbook. Before you remove the lid, check the engine is cool, as the antifreeze can get extremely hot.
After making sure your engine is cold and your car is parked on a level surface, check how much liquid is inside by locating the minimum and maximum marks on the bottle. The fluid shouldn’t be above maximum or below minimum – if it's the latter, it’ll need topping up.
The properties that stop antifreeze from boiling or freezing don’t last forever, so it needs replacing every few years. Coolant testers are available from car spares shops and generally provide an accurate reading of whether your coolant is still able to do its job.
Different types of antifreeze are available, so check your car's handbook or with your main dealer to ensure you buy the correct fluid. Whatever you choose, you’ll need to mix the antifreeze with water. The ratio of antifreeze to water depends on how cold the weather will get, but a 50:50 mix is about right for most cars in the UK. Even so, check your handbook or with your dealer for official recommendations.
Remove the coolant reservoir cap and top up to the maximum mark. Use a funnel to avoid dripping the liquid, as it can damage your car's paintwork.
Timing belt
This is one to leave to the professionals – changing a timing belt is a complex procedure that’s easy to get wrong, so we strongly recommend taking your car to a dealer when it’s due. But it’s still important to check when your car is next due to have its timing belt changed.
It will be mentioned in the owner’s manual and will be due after a certain amount of years or miles (whichever is reached first). The timing belt is a very important part of a car’s engine and the cost of repairs due to a broken timing belt will be very expensive if it’s left to wear out.
Windscreen, windscreen wipers and paintwork
They may seem like minor problems, but chips in your windscreen or paintwork need attention as soon as possible. Windscreens can crack if chips are left unattended and damaged paintwork can lead to rusty bodywork. This is worse in winter weather, when even a light frost can cause windscreen cracks to spread, and salt on the roads can accelerate rust issues.
Let’s not forget windscreen wipers, too. Wiper blades vary from one car to another, with different sizes and fitments, so ensure you get the right set for your car. You can replace the rubber strips in your existing blades, but it can be a false economy as you may find the new rubber smears, in which case you’ll need to replace them again anyway.
After making sure your wipers are turned off, gently lift them up away from the windscreen. The arms will swing upwards and stay there. You can then turn the wipers at 90 degrees to gain access to their retaining clips.
All clips vary, so have a close look at how it all fits together before you remove it. Most blades feature a raised part that pushes down to release the wiper blade. Once you hear it click, you should be able to release it.
Reverse the process to install the new blade, making sure you’ve got it the right way round. Once it’s clicked into place, gently lower the wiper into the glass and check it clears the windscreen without smearing.
- Car windscreen repair and replacement
- How to remove bird poop from a car
- Car scratch repair: a complete guide
- Best car scratch removers to buy
Clean the interior
Keeping the inside of your car tidy and well vacuumed will help maintain the condition of the interior, which will help you get a good price if you ever want to sell or part-exchange your car. Buyers and dealers will often use the condition of a car’s interior as a general indicator of how well the car has been looked after. It also gives you a chance to take out any items that may cause a strong odour.
Wash and wax your car
Washing the outside of your car is important, as it removes road salt, grime, tree sap, bird droppings and other dirt that can be corrosive to your car's paintwork. Taking the time to apply wax to the bodywork once it’s clean does not just make it look good – the wax forms a barrier between the weather and the paint, acting as a protective layer.
For specific tips on how to prepare your car for the winter, check out our winter driving tips page…
Money-saving tips when buying a car
Recommended

Classic car tax exemption: which historic vehicles qualify?
Most Popular
Tips & advice

Car dashboard warning lights: what does each symbol mean?

Electric car charging stations: public networks, charger types, apps and maps


